
You plugged in a fresh LED. It flashed once. Then it died.
Your Arduino pin looked fine on paper. The bench told a different story.
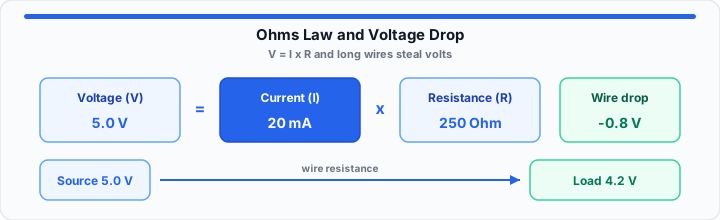
I have watched makers lose boards to invisible voltage loss. Long jumper wires act like hidden resistors. Every breadboard build carries that hidden tax. A 5 V rail at the barrel reads lower at the far header. Four point two volts is a common sight. That gap is not magic smoke. It is math. You can predict it before you solder.
Think of voltage as water pressure in a garden hose. Current is the flow rate through the pipe. A voltage drop is pressure lost across a bottleneck. That bottleneck might be wire. It might be a resistor. It might be a cheap connector. This guide maps three diagnostic blocks. Each block stands alone. Read one section or all three.
The Electrical Tension Variable
On my workbench, every dead part traces to one triangle. Voltage pushes. Current flows. Resistance fights back. Change any corner. The other two shift. That is the whole game.
Think of your resistor as a control valve. It throttles incoming current. Sensitive parts survive that throttle. Remove the valve. Current floods the load. Your LED becomes a brief flash. Then comes the burnt smell. Before you trust a scorched part on a vintage board, decode its painted rings with our resistor color band guide and the Resistor Calculator.
V = I × R
I = V ÷ R
R = V ÷ I
Know two values. Solve the third. A 5 V pin feeds a 220 Ω resistor. Current equals five divided by two-twenty. That is roughly 23 mA. Most indicator LEDs tolerate that fine.
Flip the question. You need 20 mA through a 330 Ω part. Voltage required equals 0.02 times 330. That is 6.6 V. Your 3.3 V board cannot supply it. The math saved your afternoon.
To get started, simulate your component boundaries with our quick Ohm's Law calculator. Enter any two values. Verify resistor requirements before you heat the iron.
Power dissipation at the resistor
Heat kills parts slowly. Power equals voltage times current. A 2 V drop at 20 mA dissipates 0.04 W. A quarter-watt resistor handles that easily. Never guess wattage from body size alone. Read the stripe code. Check the datasheet.
Same math at 12 V with 100 mA? That is 1.2 W. Your tiny 0603 chip resistor will cook. Size the wattage rating before you close the schematic.
P = V × I = I2 × R
The Line Resistance Multiplier
Moving onto wire losses. Bench supplies lie politely. They read 5.00 V at the terminal. Your sensor ten feet away sees less. The copper stole the rest.
Picture a long narrow garden hose. Pressure drops before water reaches the sprinkler. Wire behaves the same way. Gauge thickness controls the pipe diameter. Run length controls how far the water travels. Both steal pressure. Both steal volts.
Thicker wire means lower ohms per foot. Longer runs multiply resistance. Current times resistance equals voltage lost. In our circuit testing, skinny 30 AWG jumpers hurt first. At 500 mA they sag hard. An ESP32 reboots. Every time.
Vdrop = I × Rwire
Round-trip matters on DC breadboard builds. Current leaves the supply and returns through ground. Effective path length doubles. A ten-foot one-way run behaves like twenty feet electrically.
look up AWG diameter and resistance with our Wire Gauge Size Calculator or map out your line loss using this free voltage drop calculator. Plug in AWG size and one-way distance. Add load current. Find wire gauge limits before the demo browns out.
Copper wire resistance reference (per 1,000 ft)
In practical environments, grab the closest AWG row from this copper table. Values assume room-temperature solid copper at 60 Hz reference tables.
| AWG | Ω / 1,000 ft | Ω / ft | Typical maker use |
|---|---|---|---|
| 20 | 10.15 | 0.01015 | Long power runs, motor feeds |
| 22 | 16.14 | 0.01614 | Standard breadboard jumpers |
| 24 | 25.67 | 0.02567 | Signal lines, low-current sensors |
| 26 | 40.81 | 0.04081 | Jumper kits, short GPIO links |
| 28 | 64.90 | 0.06490 | Dupont leads — avoid on power rails |
Example: 22 AWG over six feet one-way at 300 mA. Resistance equals 0.01614 times twelve feet round-trip. That is about 0.19 Ω. Drop equals 0.3 times 0.19. Roughly 0.06 V lost. Small here. Scale current up. Losses jump fast. Scale distance up. Same story.
Open Ohm's Law Calculator Open Voltage Drop Calculator
The Breadboard Verification Target
When I prototype on a breadboard, I protect the LED first. It dies fast. It teaches resistor math cheaply. One blown LED beats one smoked regulator.
Standard red indicator specs from common datasheet sheets:
- Supply voltage: 5.0 V from USB or regulator output
- LED forward voltage (Vf): 2.0 V typical for red
- Target forward current (If): 20 mA (0.020 A)
- Resistor voltage: 5.0 − 2.0 = 3.0 V across the series resistor
- Resistor value: 3.0 ÷ 0.020 = 150 Ω → use 150 Ω or nearest 220 Ω for margin
- Resistor power: 3.0 × 0.020 = 0.06 W → 1/4 W rating is fine
- GPIO note: On 3.3 V logic, Vf still near 2.0 V — only 1.3 V remains for the resistor
At 3.3 V the same 20 mA target needs 65 Ω. Many dev boards cap pin current at 12 mA. Recalculate before you assume Uno numbers. Feather boards play by different rules.
Measure twice at the LED legs. Use a multimeter. Source voltage minus measured Vf gives the real drop. Datasheet typicals drift with temperature. LED color shifts Vf too. White and blue run near 3.0 V. Your margin shrinks overnight.
Add a 100 nF ceramic cap at the breadboard rail. It will not fix wire drop. It kills switching noise. That noise masquerades as mystery resets. Pair the cap with a thick ground return. Star grounds beat daisy chains. Sensitive ADC reads demand clean returns.
Common Maker Circuit Questions
Why does wire length increase voltage drop?
Resistance scales with conductor length. Double the run. Double the ohms. Same current through higher R means more heat. Those volts never reach your load.
How do I calculate resistor wattage for an LED?
Multiply resistor voltage by circuit current. That product is power in watts. Pick a resistor rated at double that value for safe headroom.
How do I calculate voltage drop for an LED circuit?
Subtract LED forward voltage from supply voltage. The remainder sits across the series resistor. Divide by target current to find resistance.
What AWG wire is best for short breadboard jumpers?
22 AWG solid jumpers handle most breadboard work. Step up to 20 AWG on long runs. Use thicker wire when current climbs above 200 mA.
Can voltage drop cause a microcontroller to brown out?
Yes. Sag below the regulator minimum or MCU brown-out threshold triggers resets. Measure at the chip pins, not the supply jack.