
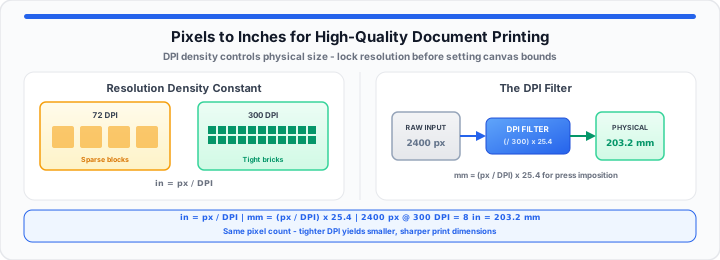
A blurry banner printed on commercial paper ruins client trust instantly. In my production layout experience, web graphics fail on press. Exporting low-resolution assets produces muddy, jagged print outputs consistently. Think of your pixel count as raw data blocks waiting. They need a physical grid assignment before printing starts. A low seventy-two DPI resolution acts like hollow cardboard blocks. It fills screen space without providing structural paper density. High three-hundred DPI resolution packs tiny solid bricks tightly together. This density yields crisp, razor-sharp edges across every sheet. Pre-press operators must verify physical dimensions before sending files. Precision raster scaling prevents catastrophic print shop reprints today. Understanding pixel grids protects your production deadlines and budget. Low pixel density creates severe customer dissatisfaction during delivery. High density ensures flawless image clarity on every substrate. Master your file parameters before printing commercial orders. Poor resolution destroys delicate typography and line details instantly. Press operators need reliable tools to evaluate incoming assets. Avoid guessing dimensions when preparing high-volume print runs. Accurate conversions save materials, ink, and valuable labor hours. To get started, evaluate your digital assets at full scale.
The Resolution Density Constant
Low-Density Screen Artifacts and DPI Multipliers
Raw digital dimensions do not dictate final physical print size. Physical size depends entirely on target dot density settings. In our press checks, screen pixels require exact raster calculation. The basic imperial equation is:
Inches = Pixels ÷ DPI
Divide total horizontal pixels by your target dot resolution. A 2400 pixel file at 300 DPI measures eight inches. That same image at seventy-two DPI stretches thirty-three inches wide. Stretching pixels across large paper surfaces creates visible screen blur. When I evaluate raw raster matrices at the console, resolution rules. High-density print production demands three hundred dots per inch minimum. To get started, check your raster asset pixel dimensions first. Designers can simulate your canvas layout with our instant Pixels to Inches Converter today. You should verify your printing parameters instantly before committing jobs. Digital displays distort true output expectations without density controls. Physical paper grids require concentrated image data for clean lines. Correct calculations eliminate costly pre-press file rejection cycles. Always lock your target DPI before setting canvas bounds. Low-resolution artifacts ruin fine typography and geometric vectors easily. Professional plotters reveal every raster flaw present within low-res files. Calculating dot distribution prevents unexpected layout distortion on press. Digital canvas sizes require translation into physical linear units. Dot multipliers control ink distribution density across paper fibers. Tight dot clusters keep ink drops organized without bleeding. Loose pixel arrangements create fuzzy edges on heavy cardstock. Check your source files early to avoid press delays. Resolution constraints dictate maximum document size before quality degrades. High-speed web presses magnify small raster errors into huge defects. Calculating accurate physical footprints ensures perfect press output always. Always convert pixels to inches for printing before plate output. This basic step preserves graphic fidelity across all media.
The Physical Metric Grid Transposition
Absolute Pixel Counts and Millimetric Precision Offsets
International commercial presses operate on strict metric paper standards. Converting pixels to millimeters requires an additional scaling factor. One physical inch equals exactly twenty-five point four millimeters. The metric physical formula is:
Millimeters = (Pixels ÷ DPI) × 25.4
Calculate your imperial inches before scaling to metric values. A twelve-hundred pixel asset at three hundred DPI gives four inches. Four inches converts directly to one hundred one point six millimeters. In practical environments, metric offsets prevent cutting alignment mistakes. Press operators rely on precise millimeter values for sheet imposition. Small rounding errors disrupt automated folding and trimming machinery. Moving onto offset press workflows, metric calculations guarantee layout accuracy. Production teams must map out your metric canvas values using the Pixels to Inches Converter now — it outputs inches and millimeters together on every entry. Pre-press managers can test your custom dimension variables with the Online Ruler for accurate layouts. Millimetric grid alignment eliminates trim drift during mass finishing runs. Target density scaling maintains sharp text vectors and line art. Modern press consoles process millimeter metrics faster than fractional inches. Automated cutting tables require metric inputs for digital registration marks. Metric scaling keeps international packaging projects uniform across locations. Precise millimetric mapping protects graphic elements near paper edges. High-speed offset presses demand exact millimeter boundary specifications. Metric conversion accuracy prevents trim errors on high-volume runs. Calculate pixel to inch document size before running metric conversions. Use a pixels to inches millimeter conversion chart for fast reference. Precision values save setting time across digital press interfaces. Pre-press efficiency increases when operators reference exact metric grids. Maintain strict tolerances when scaling digital images for packaging dies. Exact millimeter measurements prevent expensive paper waste on large orders.
| Digital Canvas Dimensions | 72 DPI Print Size (Inches) | 300 DPI Print Size (Inches) | 300 DPI Metric Output (mm) |
|---|---|---|---|
| 1080 × 1080 px | 15.00 × 15.00 in | 3.60 × 3.60 in | 91.44 × 91.44 mm |
| 1920 × 1080 px (1080p) | 26.67 × 15.00 in | 6.40 × 3.60 in | 162.56 × 91.44 mm |
| 2560 × 1440 px (2K) | 35.56 × 20.00 in | 8.53 × 4.80 in | 216.75 × 121.92 mm |
| 3840 × 2160 px (4K) | 53.33 × 30.00 in | 12.80 × 7.20 in | 325.12 × 182.88 mm |
| 1200 × 628 px (Web Banner) | 16.67 × 8.72 in | 4.00 × 2.09 in | 101.60 × 53.17 mm |
The High-Volume Press Run Protocol
Bleed Allowances and Safe Density Boundaries
High-volume commercial press runs require additional edge bleed margins. Standard print bleeds add one eighth inch to total document borders. One eighth inch equals thirty-seven point five pixels at 300 DPI. We state raw metrics and project parameters directly below.
- Standard Letter Base: 2550 × 3300 pixels yields 8.5 × 11 inches at 300 DPI.
- Full Bleed Target: 2625 × 3375 pixels yields 8.75 × 11.25 inches at 300 DPI.
- Metric Base Size: 215.9 × 279.4 millimeters base document size without bleed.
- Metric Bleed Area: 3.175 millimeters added to all four outer document edges.
- Safe Boundary Limit: 0.25 inches inside trim line prevents accidental text clipping.
- Large Poster Grid: 7200 × 10800 pixels yields 24 × 36 inches at 300 DPI.
Pre-press technicians verify bleed dimensions prior to plate exposure. Missing bleed margins cause ugly white slivers after final cutting. Calculating bleed pixels preserves image intent across large production runs. Digital templates must incorporate total physical dimensions including bleeds. Proper file setup avoids emergency pre-press holds and client delays. Large format plotters pull paper smoothly when bleed bounds align. Heavy ink coverage demands exact boundary calculations on raw stock. Pre-press technicians check edge bounds before plating commercial jobs. Consistent bleed dimensions save time during multi-page booklet trimming. Automated cutters require consistent pixel margins across all layout pages. Verify target pixel counts before exporting finalized pre-press PDF files. In my production layout experience, correct bleeds save press runs. Check all template margins before running full-speed commercial press equipment. Accurate bleed setup protects edge artwork from unexpected trim shifts. Always double-check canvas pixel calculations prior to high-volume printing runs. Cross-check area math with the Conversion Calculator when your production sheet also lists length or volume columns.
Open Pixels to Inches Converter Open Online Ruler
Frequently Asked Questions
How do you calculate pixels to inches for high-resolution printing?
Divide total pixels by your target dot per inch value. The basic calculation formula is Inches = Pixels ÷ DPI. High-quality print output requires three hundred DPI minimum.
Why does a 1080p image look blurry when printed on a large document?
A 1080p image contains 1920 by 1080 total pixels. Spreading those pixels across large paper drops the DPI low. Low DPI values force pixels to stretch into large blocks.
What is the difference between DPI and PPI in print production?
PPI defines pixel density on digital display screens. DPI measures physical ink dot density on printed paper sheets. Both metrics guide final document resolution during conversion processes.
How many pixels are in a millimeter at 300 DPI?
One millimeter contains roughly eleven point eighty-one pixels at 300 DPI. Multiply total millimeters by eleven point eighty-one for pixel counts. This calculation ensures exact metric scaling for commercial print layouts.